[UPDATE 2018/04/08: I have just returned from a 2000-mile road trip to Georgia with the Cube and it has performed flawlessly! I now consider it trip-worthy.]
Having jumped into mountain biking with both feet last Spring and realizing that I enjoy it immensely, I decided that it would be a worthwhile investment to buy and upfit an enclosed trailer for the following reasons:
Firstly, to transport one or more bikes in safety from prying eyes and the elements. (Duh!)
Secondly, to provide a place to sleep in a pinch. I usually tent camp, but tents come with their own set of extra tasks both before and after the trip, especially if the weather is nasty or the ground is muddy. An enclosed trailer will allow me to either sleep in the trailer, or move enough gear into the trailer to make room for a bed in my station wagon.
With the small towing capacity of my car, I need the smallest trailer possible, which means making the best possible use of space, which means engineering (or stealing from online) some clever solutions. Of course it will have to be modular so I can use the trailer for regular hauling missions as well.
On to the trailer!
I bought a 4' by 6' 2006 Pace American trailer secondhand, which appears to have been very well cared for by it's sole previous owner. So far so good.

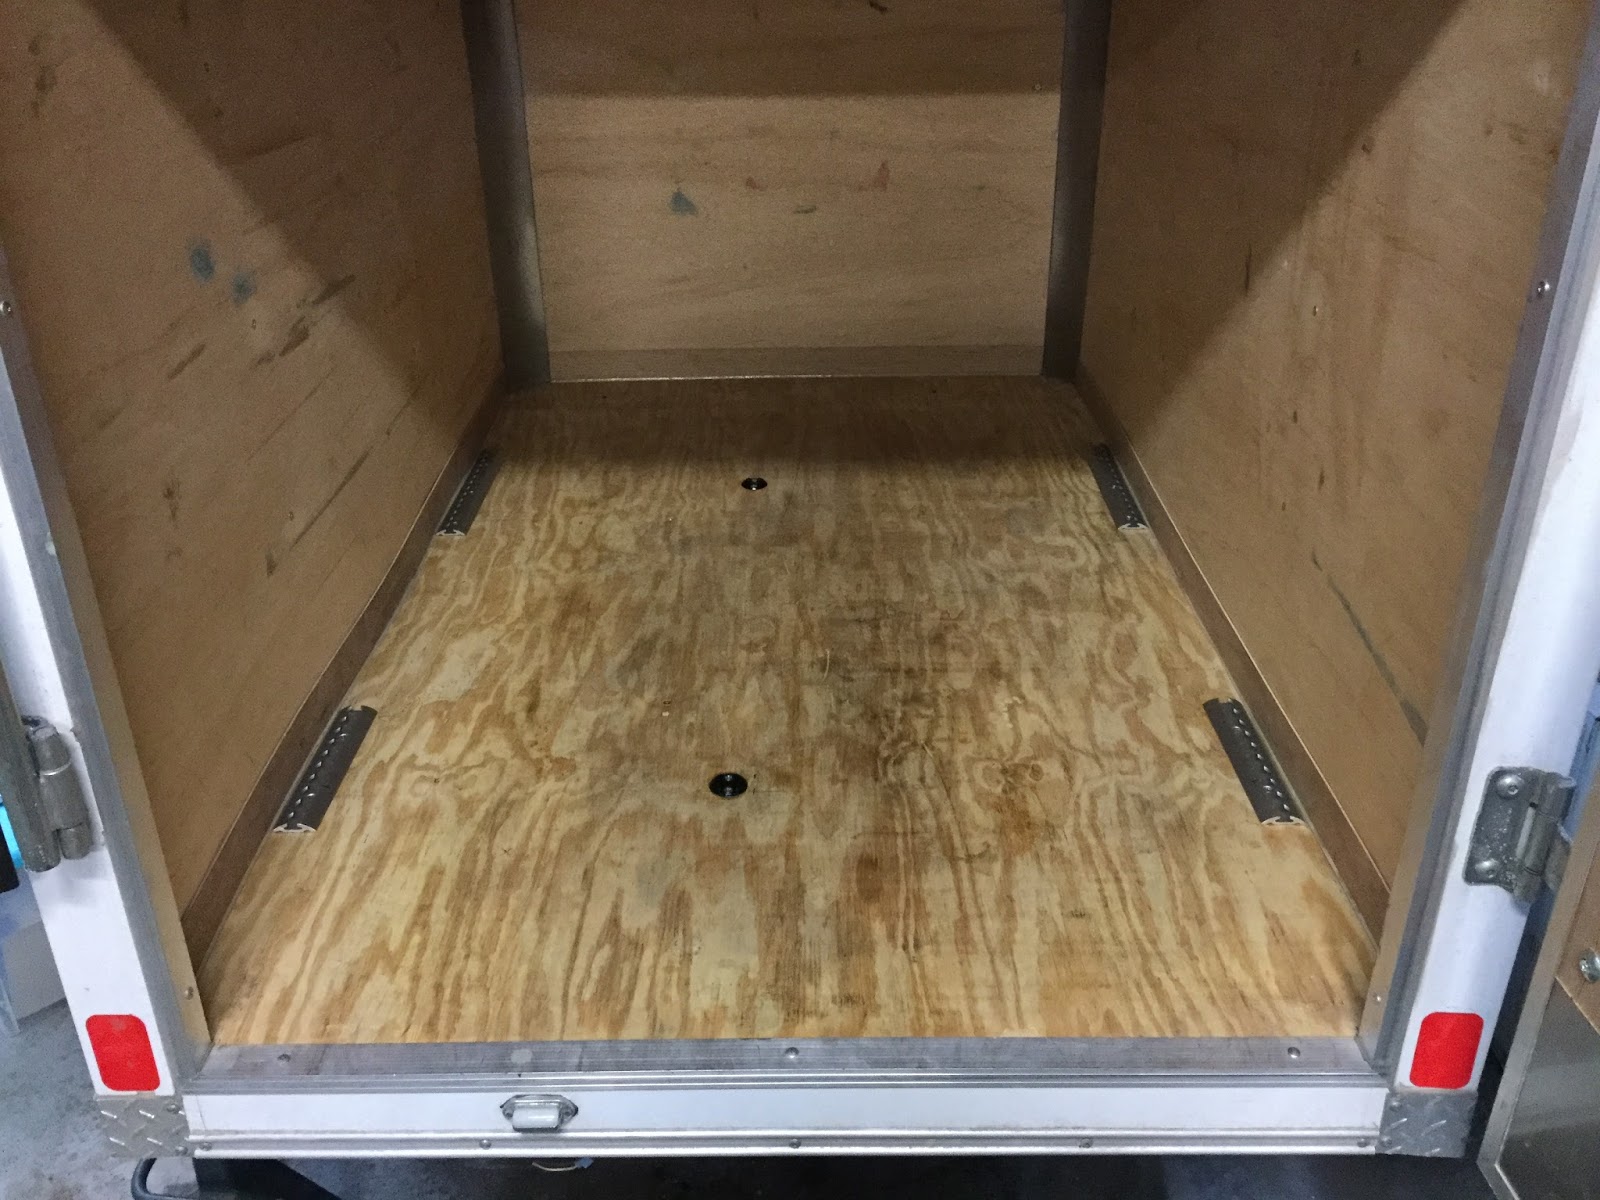
Since the trailer has some headroom over the height of an average mountain bike, I decided to create some space underneath the bikes for a folding table, chairs or what-have-you. The spacing of the average bike's axles is what I used to determine the tie-down points in the floor.

Measure, mark, measure again, step back and eyeball it to make sure everything looks right and I didn't get the numbers messed up, then measure one more time before drilling the pilot holes to screw down the track sections.


Then re-install the rubber floor mats and cut to fit.

Elevating the bikes to make use of the headroom is pretty simple. Shelves!

(You will notice that parts of the shelves, as well as possibly other bits of this project, will morph a bit throughout the build as I fine-tune things. Some of the pictures will be out of chronological order so it might be confusing.)
At this point I was still unsure whether I'd be able to fit three bikes in there, or only two. Time for some test fitting!

Oh yeah. Definitely three.
To secure the forks, I selected Delta brand fork blocks for the price-to-quality ratio as well as the wide range of hub and axle sizes that they can accommodate. NOTE that there are two packagings of this block, one of them has all the shims to fit pretty much any hub width up to 150mm (pictured) and the other only includes the block (standard 100mm width) and two 5mm shims to fit a 110mm boost hub. Some listings on Amazon are deceptive, don't trust the pictures to guarantee that the block is the version with all the shims.

I ended up buying one fat-compatible version off Ebay from a seller named Abaxo, and three of the 100-110mm versions from Nashbar.com and had a solid experience with both of those sellers.
While I'm at it, I'll jump ahead of myself for a moment and mention that I later bought a 135mm quick-release adapter for my fat bike from Velofuze.com. It slides inside the 15mm sleeve of the Delta block. I cut two sections of PVC pipe to shim the 135mm adapter from sliding side-to-side in the 100mm wide block. Here's a photo from much later in the project:
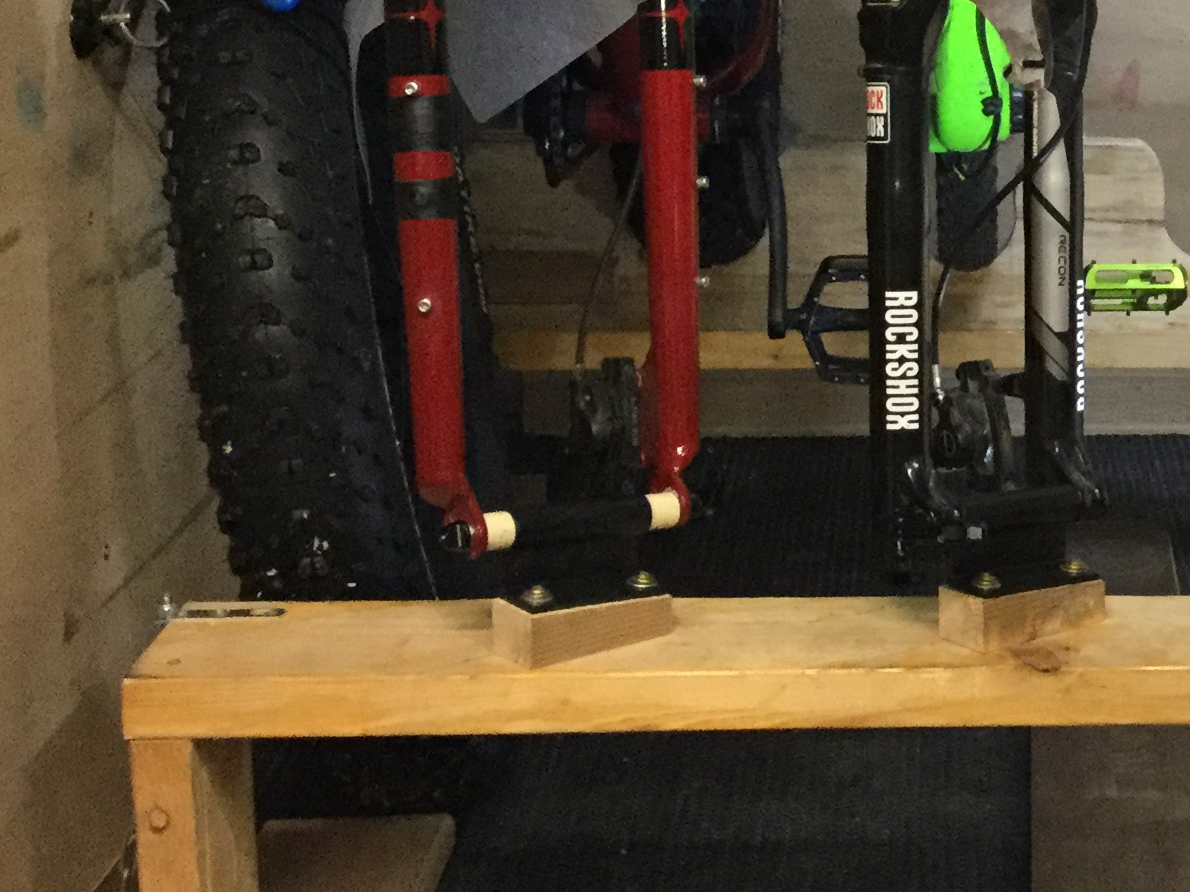
In this picture you can also see that the fork blocks are mounted on wooden blocks which have been machined to an angle (I used a disc sander). This is so that the bikes will stand generally upright with the handlebars turned. Otherwise the bikes will lean a bit due to the rake in the head tube. The actual angle isn't an exact science, different bikes have different head-tube angles so some models will have a slight lean one way or the other, but it's close enough.
The amount of angle required in the block surface is also relative to the amount that the fork is turned. I mounted the blocks at 50 degrees from perpendicular to the shelf, as that seems to be a good compromise between stability and allowing the handlebars to fit 3-wide in the trailer. Again, this calculation is not scientific. Just dead reckoning based on the test fit.
The wooden blocks also serve to raise the axles above the shelf enough so that a quick-release lever can clear while inserting or removing the axle.
You might have noticed the rear-wheel retention system in that photo as well, and that's the next step in this project! Since there won't be room to get into the forward region of the trailer after three bikes are loaded, I need a system that will secure the rear wheels from lateral movement without the need to secure any tie-downs. Again, the simplest solution presented itself:


The retention system for the shelves is pretty basic as well and allows them to be easily removed:


And that about settles the multi-bike floor plan.

Next step: Configure for solo trips! This config must be able to fit one bike in the trailer with room for a sleeping pad alongside. It must also have a method of preventing the door from being shut all the way, in case some joker decides to lock me in my own trailer while I'm asleep.
I use the same basic method for mounting as the 3-bike "crew" configuration, except that I see no need to elevate the bike since space will not be at a premium with a solo adventurer. Also, I can use a traditional strap tie-down on the rear wheel since there will be room to access it.
I did, of course, have to mount two additional one-spot tie down points in the middle of the floor. I place them off-center for three reasons: One, because the trailer tongue extends down the center under the front half of the floor and I don't want to drill into it. Two, because having eccentric mount points will allow more options for securing different-sized cargo when used for general hauling. Three, because most sleeping pads and cots start out at about two feet wide.
Again, measure multiple times, and don't forget to step back and eyeball the whole layout before drilling holes to see if anything is wonky! It's easy to get too involved in numbers and miss a common-sense point if you rely on calculations alone.


Unlike in this dramatic-reenactment photo, I braced the butt of the wrench against the frame tube for the actual tightening, since of course tape isn't going to hold the wrench secure enough to tighten the bolt.
Both points installed:

I then re-install mats, mark and drill. I suggest using a hole saw instead of the big lugger that I'm using in the pics, a hole saw will be much easier to keep steady on the uneven rubbery surface and will offer a cleaner hole.


The rest of the solo configuration is pretty self-explanatory:

The wheel hanging from the ceiling in this photo brings us to the next item on the upfit list! Accommodating the front wheels.
Thankfully, I have already tackled this issue previously on our band's equipment trailer:

In this blur-tastic shot, each hanger consists of two metal 1" straps sandwiching the steel rafter with a regular bolt securing one side and an eye-bolt securing the other.
The straps are available in the electrical supply aisle next to the conduit clamps and like items:

I bought mine at Menard's, I think it was around $2.60 for a pack of six. I bought two packs since I need eight to make the four hanging points that I want. Why four? Because three looks silly and while the trailer can only hold three bikes, I'm sure I'll find something else to hang from the fourth hanger.
Installed:

Four more one-spot o-track points installed in the walls to secure the bottom of the wheel from swinging. Measure, mark, eyeball, measure again, drill pilot holes, install one-spots using sheet metal screws.


The final issue with this system is that the wheel, secured at only the top and bottom, can still flop pretty wildly on it's yaw axis. Riding inside an enclosed trailer at 70 MPH is pretty much like experiencing a sustained earthquake for the duration of the trip, so I'm leaving nothing to chance. There's nowhere to anchor a third tie-down point in the wall.
So off I went to the local supply store (Fleet Farm) to wander around and spark ideas. My thought was to get some sort of foam and fashion blocks to shim the front and rear of the wheels, but beyond that I was stymied for the moment.
It was in the outdoor recreation aisle that I was struck with the idea that turned out to be pure genius: Pool noodle! Shock-absorbing by it's very nature! Soft enough not to stress the wheel or the trailer wall, resilient enough to keep things tidily in place! And best of all, dirt cheap!


(Those cute little mini-straps securing the wheel to the wall are also from the outdoor recreation aisle, they're sold as sleeping bag straps.)
I used a heated nail to melt some elongated holes in the noodle sections, so that I could run a strip of Velcro through and secure the noodle from shifting.
...And that's where the project stands as of today, Tuesday January 30, 2018. The next step is to install two stabilizer jacks so the trailer can be loaded, unloaded, clambered around in while it's unhitched from the car.
UPDATE: Tuesday, February 11.
Stabilizer Jack installation:
The stabilizer jacks are now installed. A couple issues to be aware of though.
Firstly, I bought mine from southwestwheel.com. I was a little trepidated by their reviews on Google, but the package did arrive although it was late and looked like it had been thrown down a flight of stairs. Not SW Wheel's fault, that's on the USPS. These are the same inexpensive jacks that can be found on Amazon.com for around $30 a pair. I paid a few dollars less by ordering directly from SW Wheel. If you don't want to deal with poor paint quality, I'd like to think that the more expensive Attwood units would have a little more attention to prep. Which brings me to list the three main issues with these jacks:
1. Hilariously-poor paint quality
2. Weak spot-welds on the feet (Amazon reviews mention this)
3. Must be shimmed or the feet will contact the frame when folded.
For the price, I'm willing to forgive some flaws, but even so I have to mention that the paint on these is ludicrously bad. It's like they sprayed the metal with cooking spray before painting. Large bits of paint had already flaked off from shipping, and I removed a good bit more with my fingernail. Still more of it flew off when hit with a blast of compressed air. I couldn't help but laugh!
Here's what they looked like fresh out of the shipping box. Note the touch-up spray job, not sure if this was done by SW Wheel or at the factory.


A note on repainting (and you WILL have to repaint these if you don't want them to instantly rust in the first wet drive). The inner sliding section of each jack is painted with a flat black paint which is different from the crap on the main body. Don't repaint this part! The locking piece relies on friction with this part, and unlike the outer paint, the paint on the inner sliding sections is quite durable.
The easy way to repaint the jacks without painting the inner slides is to simply paint them in the collapsed configuration. I used cheap implement enamel for which I paid $5.00 for a spray can.
For prep, I simply sprayed the jacks down with brake cleaner and then dried them with a compressed-air gun. I didn't see fit to spend a lot of time making these showroom-quality.
Installation: These jacks can be welded or bolted on. I opted to bolt them on since I have doubts as to their longevity and want to be able to replace them easily. I used 3/8" threaded rod and cut four studs.

TIP: Wrap the threaded rod in masking tape, this will make it easy to mark without shredding up the tip of your Sharpie.

Then I made a template out of cardboard and used it to mark stud locations on the frame.


Then I ground the weld-ends of the studs to a point. This will automatically center them in the punch marks, and will also provide an angled gap for a good solid weld.

Welded them on nice and straight. Yes I know my welds are hideous, but no-one will see them except the fourteen people who eventually read this article.

While I had the welder out, I proactively welded the front and rear edges of the feet since Amazon reviews pointed out that the spot welds on the tabs can easily be broken.
Sprayed up the stud areas with more implement enamel:

(I'm not too picky about the paint prep here, because the whole frame will be protected with Fluid Film before it leaves the shop.)
Next I had to make some shims. I consider it a design flaw that the locking mechanism near the foot will hit the frame when the jack is folded up. Easily remedied with about 1/2" of shim but still annoying.
For shim material, I was looking for a plastic cutting board but instead spent a little more on a transducer mounting plate. It cost about $16 and is nearly the perfect thickness.

The mounting plate material is a real joy to machine, predictable and soft. Should make perfect shim material.
The counter-sunk holes are to accommodate the welds around the studs and allow the shim to press flat against the frame. I used my cardboard template again to lay these out before cutting and drilling.

Bolted up! Here you can see how the leg mechanism would hit the frame if the shim wasn't there:

You may also notice that I've bent the leading edge of the foot. This is to allow a little more clearance when swinging down. And it just looks good.
Sprayed with brake cleaner, dried off with compressed air, hit up with a "finish" coat of black paint!

And that's where I am today, February 11 2018. Not much left to do before the initial shakedown: Replace the wheel on the front jack with a standard foot, and spray the undercarriage with Fluid Film!
UPDATES:

I've taken the Cube on a couple short shakedown trips, I'm not prepared to declare it fit for full-scale adventure yet but here's what I've changed so far:
1. The gold lag screws that secure the fork blocks in the pictures proved unreliable, they can work loose with the weight of a bike on them! Fortunately I noticed it before any harm could be done. I replaced the lag screws with 1/4" bolts that run through the 2x6, complete with large fender washers and nylock nuts.


I've also added a COB light just inside the door, these are very cheap at Harbor Freight and lights up the interior of the trailer very nicely.

Here is the Cube fully loaded for it's maiden voyage.


No comments:
Post a Comment